Cutting's Scissor Co. Kit by DPM Landmark Structures
By Ty’s Model Railroad - 3/28/2012 11:21:00 PM
The Cutting’s Scissor Co. kit is my second structure kit from Design
Preservation Models. My layout does not have much more room for commercial
or residential structures, but I do require a couple more industrial
structures to fill some empty real estate. I started by removing any edge
spurs left from manufacturing with a sharp knife and sanded the edges of the
wall pieces so they were a perfect 90 degrees. This ensured a good fit when
gluing the model together. This step is required on most DPM kits as the
structure joints are not at a perfect 90 degrees and constructing the model
without sanding will result in large gaps in the corner joints.
After sanding the required pieces, I washed them in warm, soapy water to
remove any oils that my hands may have left on them. Once dry, I glued the
walls carefully together on a level surface, ensuring the wall pieces fit
together perfectly and evenly. I made sure each corner was square by using a
square wood dowel on the inside of each corner joint.
Once the structure had dried for an hour, I cut 2 roof sections from a
sheet of supplied styrene. I also glued on the roof supports which were also
supplied in the kit via a bulk length of strip styrene. I did not glue the
roof panels on at this point as I needed the roof open to add window glazing
and interior details later on. The kit also calls for awnings over the
loading bays using a leftover piece of styrene from the roof structures. I
opted for a textured styrene awning that I had left over in my scrap bin,
which looked more authentic. I also added horizontal supports for the
awnings using narrow strip styrene.
After two coats of brick red paint had dried, I masked the structure so I
could paint the building trim, windows, and doors. Masking takes time, and
as hard as I try to paint free hand, I can never achieve the same crisp
lines and accuracy as I do when I mask. I use a small flat head jeweler’s
screwdriver to press the masking tape into tight corners and on narrow edges
to make sure paint doesn’t bleed underneath. Bleeding paint isn’t 100%
avoidable, but is easy enough to touch up in the final steps of
painting.
Once the model was painted, I weathered it lightly with pastel powder and
applied a dry transfer decal (Velikovski’s Distributors) to the exterior
wall. The last paint layer was a final spray of dull-coat to seal everything
in. I applied clear styrene for window glazing then cut and applied printed
paper blinds to the inside of the windows
(click here for my printable blind templates).
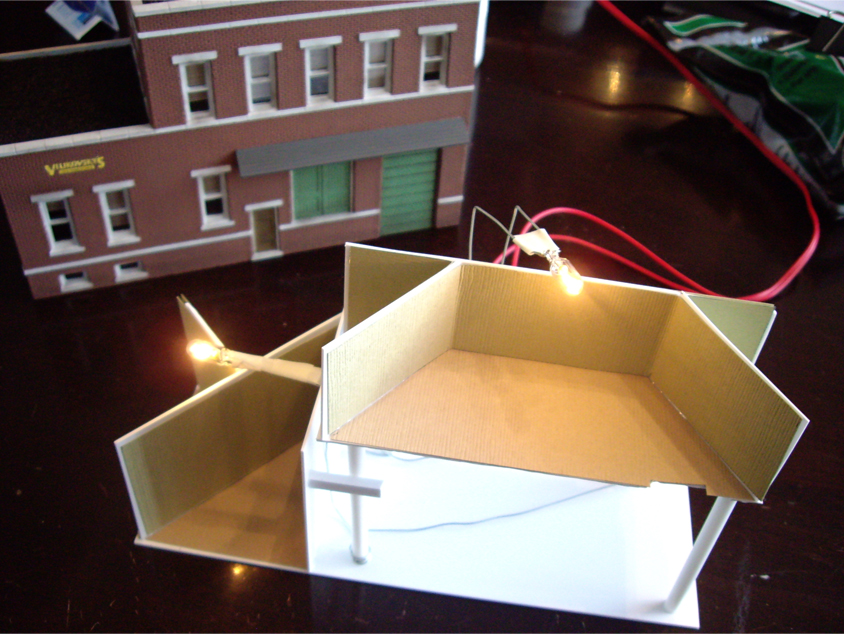
As most previous structures I have built, the interior is completely
removable from the building structure. By simply sliding the exterior shell
off, I can easily access the lights and add interior details in the future.
The interior structure is built in such a way that once fully inserted into
the building’s shell, the building looks as if it is full of separate rooms
when looking through any of the small windows. This prevents a 'see through'
look. Craft paper was used for texture and colour on the floors and
walls.
Two small automotive bulbs light the structure. Since the interior walls
only rise as high as the tops of the windows and don’t go right to the roof,
I installed the bulbs above the interior rooms so one bulb could light
multiple rooms. Aluminum foil installed on the underside of the roof
structure helps reflect the light downward into the rooms and keeps heat
from melting the roof structure. I used narrow bare steel wire to supply
power to the bulbs. I also used this type of wire to support the bulbs so
they wouldn’t have to be attached directly to the styrene structure. Just be
careful the bare wires don’t get crossed or you will have a nasty short on
your hands.
The last step was to attach the roof structures to the model. Once the
styrene roof was glued to its supports and had dried, I applied a thin layer
of medium cinders on top of the roof and leveled it with a folded piece of
paper. Using a small pipette, I gently soaked the cinders with isopropyl
alcohol. I then used the a pipette to apply white glue thinned with water.
After drying overnight, the cinders were securely fastened to the
model.


